Have you ever had one of those days where you want everything to just come together so you can finally exhale? Well, I'm still waiting for that moment and it's been a couple of weeks!! The family and I are planning a trip abroad and trying to figure out and organize packing for an overseas trip with two little kiddos has been an insane process and it's still not all done! In addition to all this packing and general worrying, I am in my last semester of law school and feel like I am going to literally go INSANE!!
So basically I have 3 full days to read for classes PLUS the assignments I'm going to miss, keep the house in a livable condition, make breakfasts, lunches, dinners, pack for four people for this enormous trip, and think ahead to keep little ones happy and entertained on a 24 hour journey with 18 hours on a plane. I don't know when I'll exhale that sigh of relief when it comes to all of this stuff.
However, when I find myself in overwhelming situations like the one I just described above, I like to take a moment and look at things that make me happy. With that said, I'm not necessarily a sappy person, but I am definitely a person who likes to promote a positive point of view and like to push people to do better, including myself.
So when I found myself subconsciously hyperventilating about this big mess, I thought about the wonderful opportunities in front of me and how lucky I am to be able to be in law school and be so close to graduation and how lucky we are to be able to have an opportunity to travel as extensively as we do. That doesn't always make me completely relax, but it helps a great deal when I sense I am getting irritable. I'm sorry if that sounds like a "happy go-lucky" person. But that's just me. I have to work at being sane and that often means taking a step back and being grateful. And, I have to do it quite often due to the schedule that's placed before me.
I also find myself wanting to do more for others when I feel overwhelmed. Why? Because I force myself to remember others when I'm being that self-absorbed. I feel better about doing things for others and maintains a connection with friends sometimes when we are too busy with our own lives.
Hope all of you have a day/week full of peace and happiness and if there is something holding you back from breathing that sigh of relief, then let one out anyways by remembering the things that make you happy. =)
Monday, January 30, 2012
Sunday, January 22, 2012
Bread Bakin' extravaganza!!
Sorry it's taken me a while to post again, however, I'm still stuck in law school for another semester and had to figure lovely registration issues. Anyways, I have been baking bread lately. A LOT OF BREAD! Like an average of 2 loaves per week. I've made bread before many times before so that's nothing new. However, this year I decided that I would bake my own on a consistent level so that we did not have to go out to purchase grocery store bread. The price difference isn't great but if you're anything like me, it will be a heck of a lot cheaper for you to bake your own bread as opposed to buying it from the store because everytime I go to the grocery store for just 'one thing', I inevitably come out with 6 other things as well. So in that sense, this bread baking at home is keeping me safe from spontaneous shopping.
This is a great everyday sandwich bread, or toasted with butter and jam, or actually I've even used it as a base for bruschetta! So basically, it's a great overall bread and really easy to prepare and have ready for the next morning. Just allow enough time for the risings.
AWESOME EVERYDAY BREAD
INGREDIENTS:

3.5 cups of bread flour + 1/4 cup for bench flour and in case too sticky
*(can also make it wheat bread by substituting 1 cup of the regular bread flour for wheat flour)
1 pkg of Rapid Rise yeast
2 tsp salt
1 cup milk
4 Tbs melted butter + 1 additional Tbs melted butter
3 Tbs honey
1/3 cup water
DIRECTIONS:
1. Measure out dry ingredients in the bowl of a stand mixer and set aside.

2. In a microwave-safe bowl, melt the butter and set aside. In another microwave-safe bowl (I like to use a large glass Pyrex measuring cup) measure the milk and water and heat for about 1 minute until it registers at 110 degrees. If you do not have a food thermometer, then it should be much warmer than luke warm but not burning hot either. I would really recommend getting a food thermometer because you can use it for a variety of things and it's not expensive at all! After the milk and water reaches 110 degrees, add in ONLY 4 Tbs of the melted butter (you'll need the rest for brushing on top of the loaf when ready to bake) and the 3 Tbs of honey and whisk until completely dissolved.

3. Using the dough hook attachment on your mixer, slowly add the milk mixture to the flour mixture while the mixer is on low. When all the dough seems to have been mixed (about a minute or so) then turn the mixer to medium speed and mix for 10 minutes or until the dough pulls away from the sides and is glossy. If after 5 minutes of mixing the dough still seems extremely sticky, then add more flour a Tbs at a time until it comes together. Don't add too much flour because it will become super dense. After 10 minutes, your dough should look like this:


See how it's not sticking that much to the sides? That's what you want.
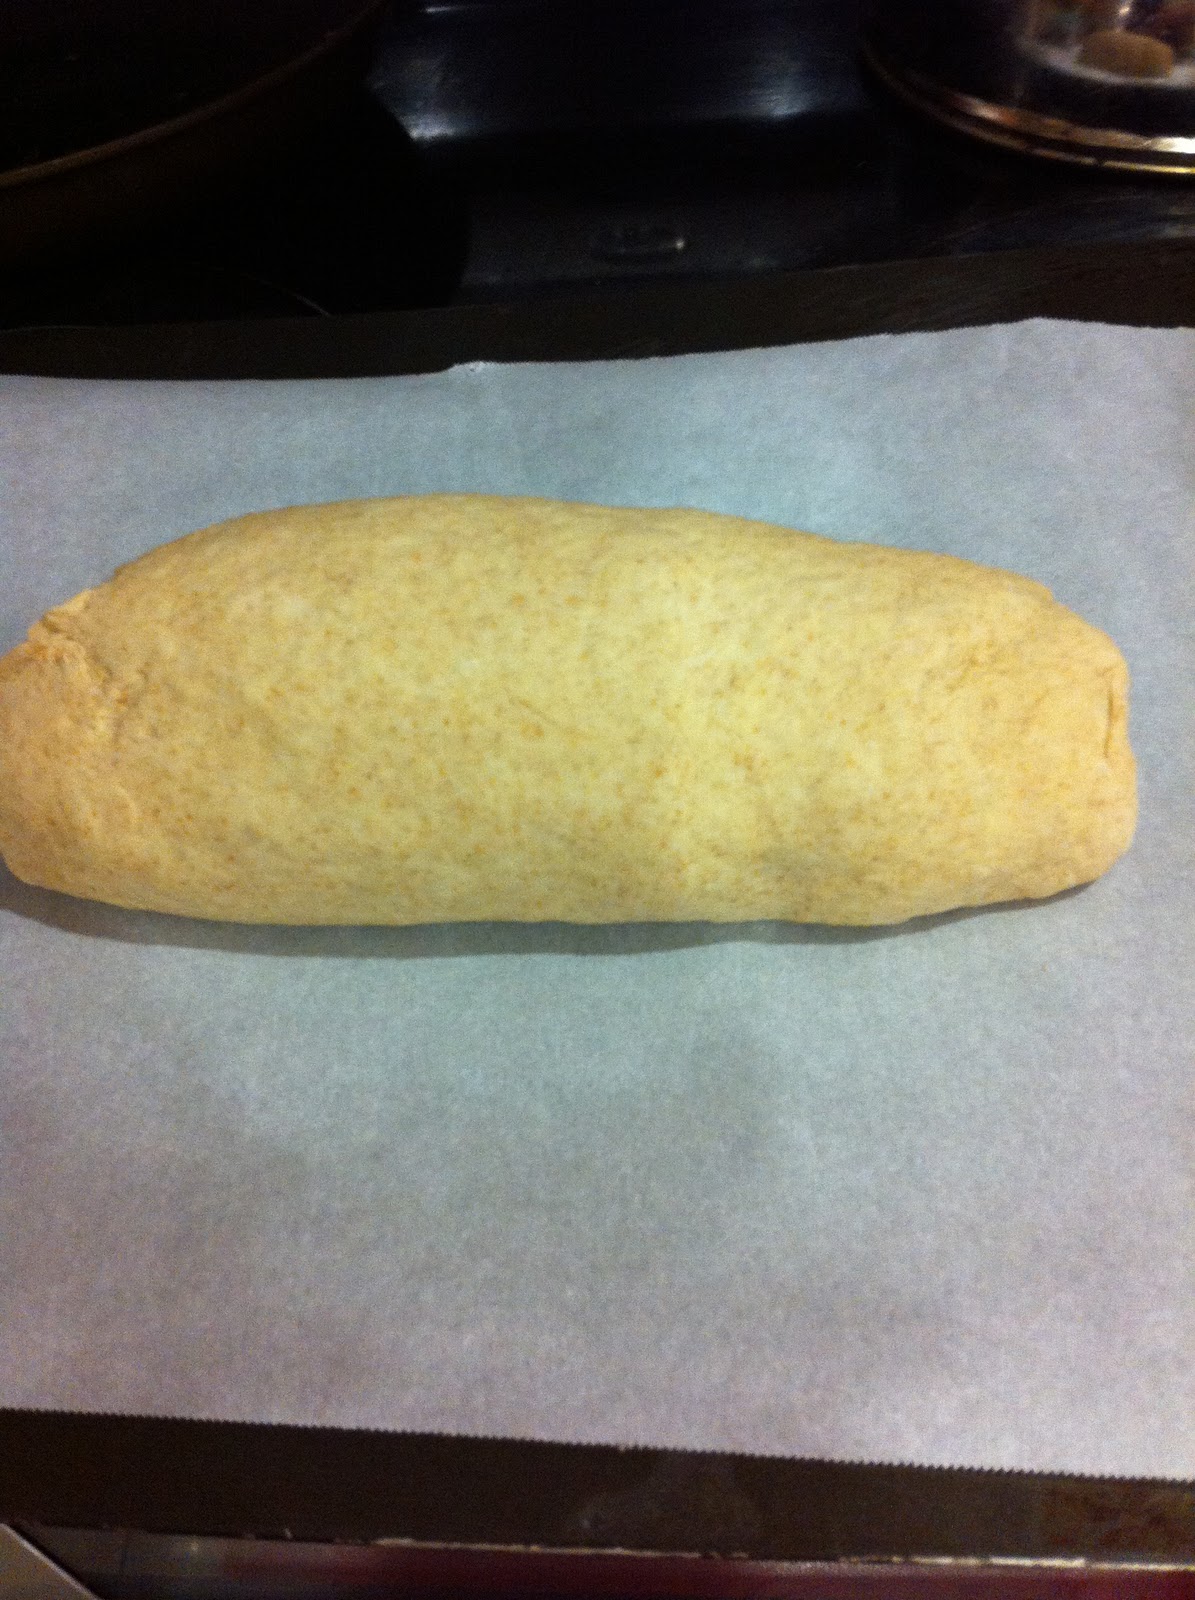
4. Use a little of the remaining flour to dust a clean surface (I use my granite counter tops) to knead the dough. Pull the dough out on to the floured surface and knead the dough for about 3 minutes. You want to knead it at least 10 times to develop the gluten for a good interior. After kneading, turn the dough into a tight ball making sure to pinch the sides under the dough. The reason you want a tight dough ball is to create some tension on the surface and to ensure it's really smooth. After you have a smooth ball of dough, place it into a lightly oiled bowl, cover with plastic wrap and then a cloth and let rise in a warm place for 1.5 hours.


5. After the first rising, take the dough out, punch it down like it stole your parking spot on a rainy day, and knead again. This time you want to knead it less than the first time and at this point you can either place it into a lightly oiled bread loaf pan or you can free form for a more rustic look. I like to free form because it just looks pretty. =) If doing a free form, then use a piece of parchment paper under it as well as something like a rimless baking sheet for easy transportation to and from the oven.

6. Cover the loaf with the same plastic wrap and cloth again and let rise again for 1.5 hours.

7. About 15 minutes before the second and final rising is done, get your oven ready to bake some bread! Preheat oven to 350 degrees and boil some water. If doing a free form bread, then place a pizza stone into the oven to allow it to get hot during the preheating stage. If you don't have a pizza stone, you could use a baking sheet however, the results may not be as good. =(
8. At the same time you are heating the pizza stone, put in an empty oven proof baking pan in the oven too. I use an old rusted bread loaf pan not suitable for baking anymore. We are simply using this additional baking pan as a way to steam the bread because we will be adding the boiling water to that pan. After the oven is ready, use the remaining melted butter to brush over the top off the loaf, place your free form bread including the parchment paper but not the baking sheet, on to the pizza stone and pour boiling water into empty baking pan and shut the oven door and allow to bake for 40 minutes. If using a bread pan, then just place it into the oven.

9. After 40 minutes, you should have an incredible loaf of bread! Take the bread out and let it rest for at least 30 minutes to an hour before cutting into it. Or, you could break the rules and just cut yourself a slice to see how awesome it is with butter melting on it while you inhale that first slice!


This is a great everyday sandwich bread, or toasted with butter and jam, or actually I've even used it as a base for bruschetta! So basically, it's a great overall bread and really easy to prepare and have ready for the next morning. Just allow enough time for the risings.
AWESOME EVERYDAY BREAD
INGREDIENTS:

3.5 cups of bread flour + 1/4 cup for bench flour and in case too sticky
*(can also make it wheat bread by substituting 1 cup of the regular bread flour for wheat flour)
1 pkg of Rapid Rise yeast
2 tsp salt
1 cup milk
4 Tbs melted butter + 1 additional Tbs melted butter
3 Tbs honey
1/3 cup water
DIRECTIONS:
1. Measure out dry ingredients in the bowl of a stand mixer and set aside.

2. In a microwave-safe bowl, melt the butter and set aside. In another microwave-safe bowl (I like to use a large glass Pyrex measuring cup) measure the milk and water and heat for about 1 minute until it registers at 110 degrees. If you do not have a food thermometer, then it should be much warmer than luke warm but not burning hot either. I would really recommend getting a food thermometer because you can use it for a variety of things and it's not expensive at all! After the milk and water reaches 110 degrees, add in ONLY 4 Tbs of the melted butter (you'll need the rest for brushing on top of the loaf when ready to bake) and the 3 Tbs of honey and whisk until completely dissolved.

3. Using the dough hook attachment on your mixer, slowly add the milk mixture to the flour mixture while the mixer is on low. When all the dough seems to have been mixed (about a minute or so) then turn the mixer to medium speed and mix for 10 minutes or until the dough pulls away from the sides and is glossy. If after 5 minutes of mixing the dough still seems extremely sticky, then add more flour a Tbs at a time until it comes together. Don't add too much flour because it will become super dense. After 10 minutes, your dough should look like this:


See how it's not sticking that much to the sides? That's what you want.
4. Use a little of the remaining flour to dust a clean surface (I use my granite counter tops) to knead the dough. Pull the dough out on to the floured surface and knead the dough for about 3 minutes. You want to knead it at least 10 times to develop the gluten for a good interior. After kneading, turn the dough into a tight ball making sure to pinch the sides under the dough. The reason you want a tight dough ball is to create some tension on the surface and to ensure it's really smooth. After you have a smooth ball of dough, place it into a lightly oiled bowl, cover with plastic wrap and then a cloth and let rise in a warm place for 1.5 hours.


5. After the first rising, take the dough out, punch it down like it stole your parking spot on a rainy day, and knead again. This time you want to knead it less than the first time and at this point you can either place it into a lightly oiled bread loaf pan or you can free form for a more rustic look. I like to free form because it just looks pretty. =) If doing a free form, then use a piece of parchment paper under it as well as something like a rimless baking sheet for easy transportation to and from the oven.
6. Cover the loaf with the same plastic wrap and cloth again and let rise again for 1.5 hours.

7. About 15 minutes before the second and final rising is done, get your oven ready to bake some bread! Preheat oven to 350 degrees and boil some water. If doing a free form bread, then place a pizza stone into the oven to allow it to get hot during the preheating stage. If you don't have a pizza stone, you could use a baking sheet however, the results may not be as good. =(
8. At the same time you are heating the pizza stone, put in an empty oven proof baking pan in the oven too. I use an old rusted bread loaf pan not suitable for baking anymore. We are simply using this additional baking pan as a way to steam the bread because we will be adding the boiling water to that pan. After the oven is ready, use the remaining melted butter to brush over the top off the loaf, place your free form bread including the parchment paper but not the baking sheet, on to the pizza stone and pour boiling water into empty baking pan and shut the oven door and allow to bake for 40 minutes. If using a bread pan, then just place it into the oven.

9. After 40 minutes, you should have an incredible loaf of bread! Take the bread out and let it rest for at least 30 minutes to an hour before cutting into it. Or, you could break the rules and just cut yourself a slice to see how awesome it is with butter melting on it while you inhale that first slice!


Thursday, January 5, 2012
What I aspire to bake tonight
I am not ashamed to say I am a Pinner. It's an amazing concept and I believe the world is a better place for it. (Too much?) Ok, anyways, it's fun and I stumble across stuff all the time. This recipe is something I saw last week and have been dreaming of it since that time. It's a Cinnamon Sugar Pull Apart Bread from Joy the Baker and can be found here: Cinnamon Sugar Pull Apart Bread
Let me begin by stating that it took me a long while to finally decide I was going to make this bread. Why? Because I was trying to time everything perfectly so I would be able to sit with a cup of tea and enjoy this creation. I was glad I found the time to finally make it because it was most definitely worth the wait and effort. The entire process of making the dough was relaxing for me because I enjoy working with doughs and the aroma that filled the house when it was baking was incredible. Let me also add that the bread lasted a little over 24 hours. In other words, my husband and I devoured the entire thing in a day. So be warned! Each layer was so easy to pull off on our way in and out of the dining room. Before we knew it, it was gone.
As scary as it is to know that you may bake some thing that you alone could polish off in a day, I still highly recommend you give this a try. Your friends and family will be impressed but, more importantly, it may become a staple at your home.
Cinnamon Sugar Pull-Apart Bread

5. Add the eggs and stir the mixture until the eggs are incorporated into the batter. The eggs will feel soupy and it’ll seem like the dough and the eggs are never going to come together. Keep stirring. Add the remaining 3/4 cup of flour and stir with the spatula (or paddle attachment on the mixer at medium speed) for about 2 minutes. The mixture will be sticky but that’s just right. How sticky?? See my picture below.


 Yeah, THAT sticky!
6. Place the dough is a large, greased bowl. Cover with plastic wrap and a clean kitchen towel. Place in a warm space and allow to rest until doubled in size, about 1 hour. *The dough can be risen until doubled in size, then refrigerated overnight for use in the morning. If you’re using this method, just let the dough rest on the counter for 30 minutes before following the roll-out directions below.


Let me begin by stating that it took me a long while to finally decide I was going to make this bread. Why? Because I was trying to time everything perfectly so I would be able to sit with a cup of tea and enjoy this creation. I was glad I found the time to finally make it because it was most definitely worth the wait and effort. The entire process of making the dough was relaxing for me because I enjoy working with doughs and the aroma that filled the house when it was baking was incredible. Let me also add that the bread lasted a little over 24 hours. In other words, my husband and I devoured the entire thing in a day. So be warned! Each layer was so easy to pull off on our way in and out of the dining room. Before we knew it, it was gone.
As scary as it is to know that you may bake some thing that you alone could polish off in a day, I still highly recommend you give this a try. Your friends and family will be impressed but, more importantly, it may become a staple at your home.
Cinnamon Sugar Pull-Apart Bread
Makes: one 9x5x3-inch loaf
INGREDIENTS:
For the Dough:
INGREDIENTS:
For the Dough:
2 3/4 cups plus 2 tablespoons all-purpose flour
1/4 cup granulated sugar
2 1/4 teaspoons (1 envelope) active dry yeast
1/2 teaspoon salt
2 ounces (1/2 stick or 4 TBS) unsalted butter
1/3 cup whole milk
1/4 cup water
2 large eggs, at room temperature
1 teaspoon pure vanilla extract
For the Filling:
1/4 cup granulated sugar
2 1/4 teaspoons (1 envelope) active dry yeast
1/2 teaspoon salt
2 ounces (1/2 stick or 4 TBS) unsalted butter
1/3 cup whole milk
1/4 cup water
2 large eggs, at room temperature
1 teaspoon pure vanilla extract
For the Filling:
1 cup granulated sugar
2 teaspoons ground cinnamon
1/2 teaspoon fresh ground nutmeg
2 ounces(1/2 stick or 4 TBS) unsalted butter, melted until browned
DIRECTIONS:
* The first step in the directions of any recipe should be: " READ THE ENTIRE RECIPE" so you get a feel for what you are going to be doing and then "GATHER ALL THE INGREDIENTS!!" It's important to have everything measured and ready for use so that you waste less time and are organized. Ok, moving on.
1. In a large mixing bowl (I used just the bowl of my stand mixer) whisk together 2 cups flour, sugar, yeast, and salt. Set aside.


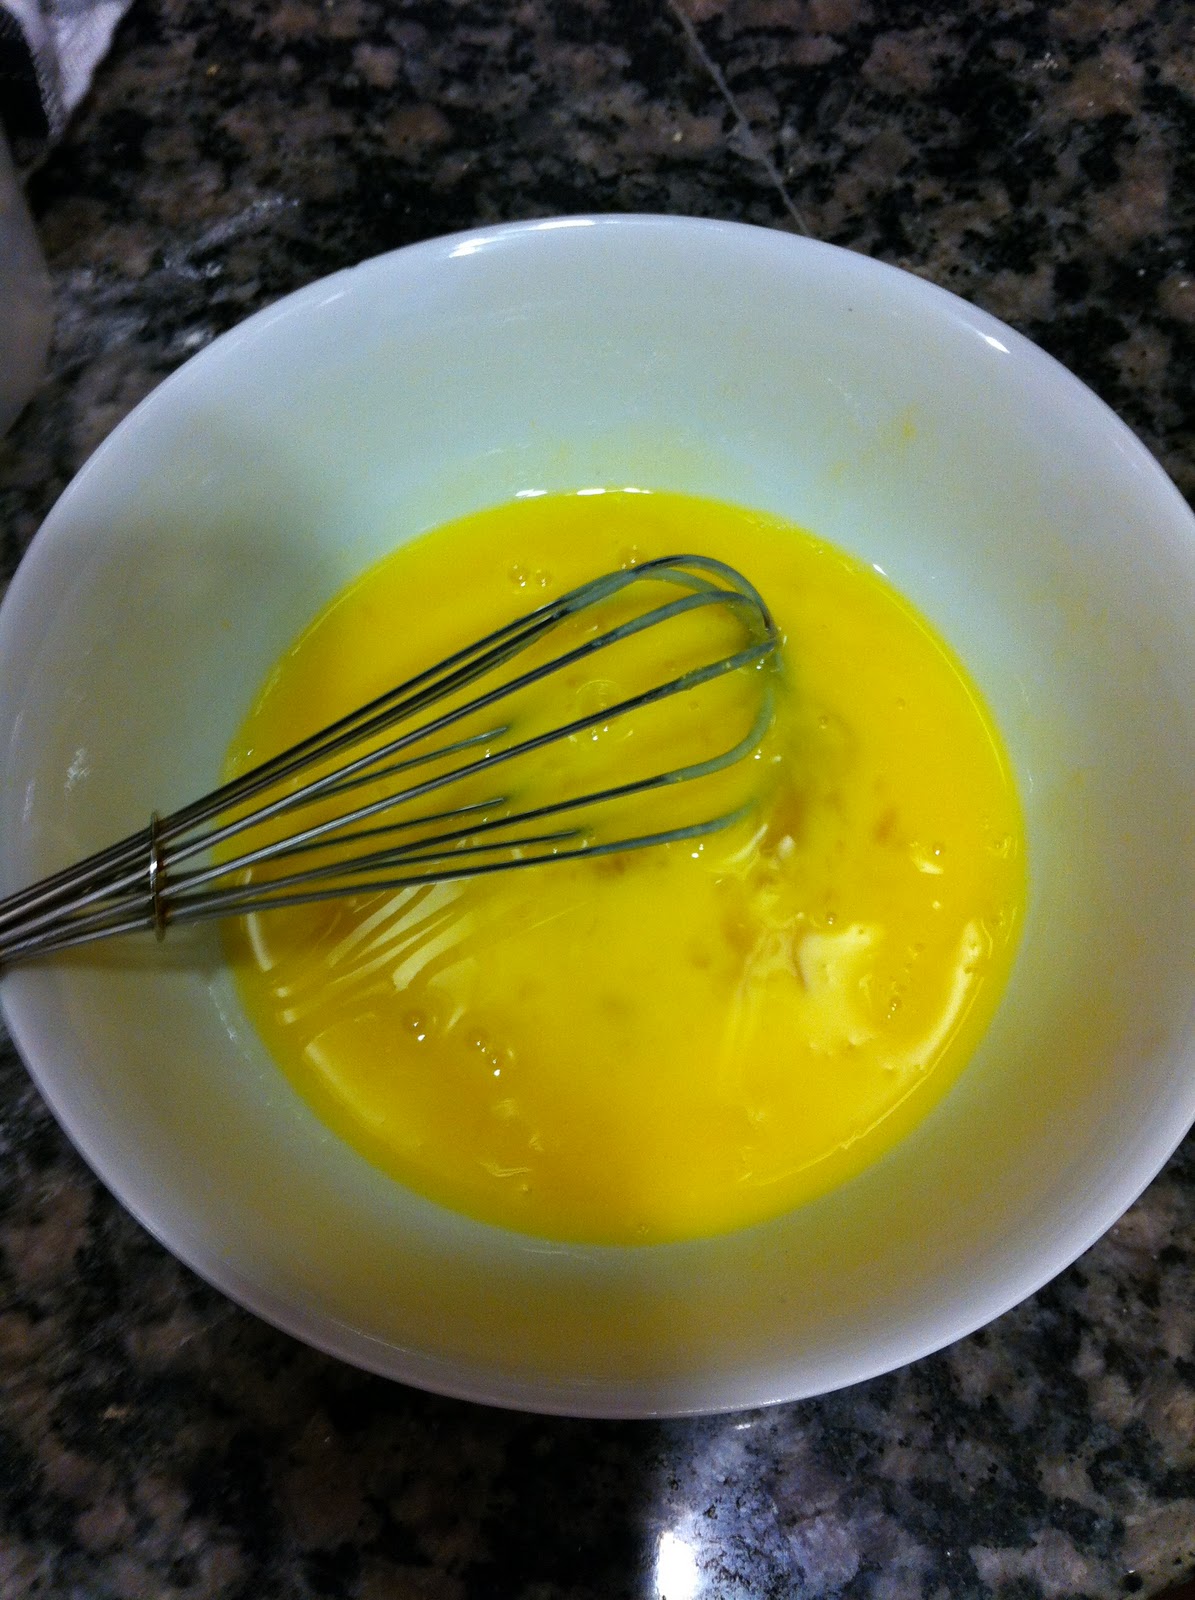
2. Whisk together eggs and set aside.

3. In a small saucepan, melt together milk and butter until butter has just melted. Remove from the heat and add water and vanilla extract. Let mixture stand for a minute or two, or until the mixture registers 115 to 125 degrees F.


4. Pour the milk mixture into the dry ingredients and mix with a spatula.


5. Add the eggs and stir the mixture until the eggs are incorporated into the batter. The eggs will feel soupy and it’ll seem like the dough and the eggs are never going to come together. Keep stirring. Add the remaining 3/4 cup of flour and stir with the spatula (or paddle attachment on the mixer at medium speed) for about 2 minutes. The mixture will be sticky but that’s just right. How sticky?? See my picture below.


6. Place the dough is a large, greased bowl. Cover with plastic wrap and a clean kitchen towel. Place in a warm space and allow to rest until doubled in size, about 1 hour. *The dough can be risen until doubled in size, then refrigerated overnight for use in the morning. If you’re using this method, just let the dough rest on the counter for 30 minutes before following the roll-out directions below.


6. While the dough rises, whisk together the sugar, cinnamon and nutmeg for the filling. Set aside. Melt 2 ounces of butter until browned. Set aside. Grease and flour a 9x5x3-inch loaf pan. Set that aside too.


7. Deflate the risen dough and knead about 2 tablespoons of flour into the dough. Cover with a clean kitchen towel and let rest for 5 minutes. On a lightly floured work surface, use a rolling pin to roll the dough out. The dough should be 12-inches tall and about 20-inches long. If you can’t get the dough to 20-inches long… that’s okay. Just roll it as large as the dough will go. Use a pastry brush to spread melted butter across all of the dough. Sprinkle with all of the sugar and cinnamon mixture. It might seem like a lot of sugar. Seriously? Just go for it.


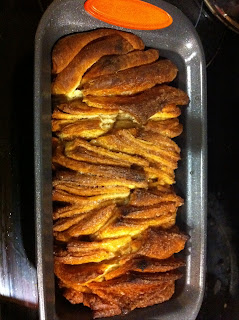
8. Slice the dough vertically, into six equal-sized strips. Stack the strips on top of one another and slice the stack into six equal slices once again. You’ll have six stacks of six squares. Layer the dough squares in the loaf pan like a flip-book. Place a kitchen towel over the loaf pan and allow in a warm place for 30 to 45 minutes or until almost doubled in size.


9. Place a rack in the center of the oven and preheat to 350 degrees F. Place loaf in the oven and bake for 30 to 35 minutes, until the top is very golden brown. The top may be lightly browned, but the center may still be raw. A nice, dark, golden brown will ensure that the center is cooked as well.

10. Remove from the oven and allow to rest for 20 to 30 minutes. Run a butter knife around the edges of the pan to loosen the bread and invert onto a clean board. Place a cake stand or cake plate on top of the upside down loaf, and carefully invert so it’s right side up.(I don't know where my picture of this step went, but you get the idea). Serve warm with coffee or tea.


10. Remove from the oven and allow to rest for 20 to 30 minutes. Run a butter knife around the edges of the pan to loosen the bread and invert onto a clean board. Place a cake stand or cake plate on top of the upside down loaf, and carefully invert so it’s right side up.(I don't know where my picture of this step went, but you get the idea). Serve warm with coffee or tea.

Finally, an intro!
I have had this blogger account for so long and just sat on it because law school proved to be quite demanding! I have finally updated everything and am ready to blog. Why blog? Hmmmm...probably because it's easier to keep all the randomness in my life contained in one spot than the random notes I leave myself throughout my home.
So, a little about me. I'm finishing up my last year of law school, have two little kiddos (a boy 2 1/2 and a girl 1),


I'm married to my soul mate (yes, they exist) and I am the most seemingly 'put together' person. This obviously baffles me. My friends often wonder "how do you do it?", I usually look at my husband and snicker because he knows the behind the scenes chaos that usually ensues at our house. With that said, I will say, I don't watch much TV and like to consider myself to be a 'doer'. I like to do things and move forward. I don't often over think things and follow Nike's simple adage, "Just do it!"
As corny as the above intro has been, I promise, it'll only get cornier and weirder.
Also, I like to cook, be creative, promote peace and charity and on my lazy days, I like to be a lazy lazy person, like today, which is why I had time to do all this blogging. Last night I stayed up entirely too late watching Through the Wormhole with Morgan Freeman. Have you seen the this series?? It's mind blowing annnnnnnd nerdy. I also have an itch to bake tonight. I'll post pics when this project comes to fruition. Welcome to getting to know me!
Subscribe to:
Comments (Atom)